From our hazardous testing conducted during the project’s feasibility study, we knew that the popcorn ceiling contained asbestos. Our demolition started with removing the kitchen cabinets, window treatments, and surface-mounted lighting that were touching or in the way of the ceilings. Next, we abated the popcorn ceiling. Since we planned to do extensive beam work, we decided to remove the drywall ceiling with the popcorn to save on labor later in the project. The abatement crew then laid their own protection over ours and sealed off the hallway where the popcorn ceiling ended. They also set up a clean room outside for entering and exiting with their protective gear. FYI: Abatement companies are certified and they file their own permits. There is a 10-day waiting period before starting the abatement.
After removing the asbestos, we returned to demolish the drywall on the walls, the flooring which was not to be salvaged, the brick façade on the fireplace, and the entire laundry room. Usually, after demolition, there is a possibility of a change order. Unfortunately, the Jones home was no exception. We discovered work mistakes made by previous contractors including junction boxes hidden behind the drywall, ungrounded light boxes, and multiple wires connected to a single breaker in the service panel. We also found where a hot wire had charred the roof framing. The Joneses felt fortunate because this could have caused a major fire.
As we installed the temporary support for the walls that were to be removed, our electrician pulled out the existing wiring. We cut an access hole at the front of the house to slide in a 30-foot glue-lam beam (GLB) above the rafters, which allowed us to remove the shared hallway and living room wall. Then, we maneuvered a 15-foot GLB beam above the shared kitchen and living room wall that intersected with the 30-foot GLB to enable us to remove this wall as well. Now, we have the wide-open floor plan the family envisioned. With the major framing and beam work completed, Bryan, the lead carpenter, held a meeting with the electrician, plumber, and HVAC team to coordinate their responsibilities and work together. This gave Bryan and his crew time to focus on moving and installing windows and doors.
At the front of the home, we removed the small, red entry door to make space for expanding the kitchen wall and accommodate the refrigerator and cabinets. The new set of double French doors will be installed where the window is opposite the former red door. With the addition of the new front porch, this will clarify the actual front of the home. On the side of the house, we removed a window to create more upper kitchen cabinetry space. The small side door was then converted into a glass patio sliding door.
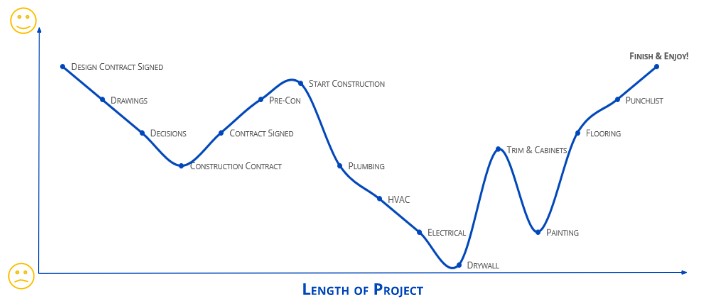
This is a good time to pause and discuss the Remodeling Emotional Roller Coaster. Before starting a project, we send out a document called “
Preparing For Your Remodel” that explains what you can expect. In this, you will find “The Emotional Roller Coaster” chart (see below). From our first meeting, through the design phase, and until the project’s completion, you will experience highs and lows. One key milestone is when we reach the drywall stage. Demolition begins quickly and is exciting; framing then shows you how the space will look. After that, it often feels like a long wait to complete the installation of the HVAC mini-splits system with inspection, rough-in plumbing with inspections, rough-in electrical with inspections, framing inspections, and finally insulation with inspection, until it's okay to cover the walls with drywall. The Shirey Team wants to be sure all drywall preparation is complete at this stage to ensure a smooth transition into drywall. Nothing is more frustrating for us than opening freshly hung drywall to fix something that was overlooked.
On the other hand, our client doesn’t always realize what it takes to get to drywall. They’re at the bottom of their emotional roller coaster because it feels like the project has been stalling. However, once that first sheet of drywall is raised into place, so do the clients’ spirits. By then the drywall crew will have hung, taped, mudded, sanded, primed, and cleaned up, leaving the home ready for the Jones’ walkthrough. Now the excitement is building.
In our next newsletter, we will discuss the finishes. This is when we can showcase all the beautiful designer elements that you can see and touch now that we have prepared and laid a proper foundation.